


The Essential Guide to Melt and Pour Soap Bases
Posted by MH on Aug 24th 2020
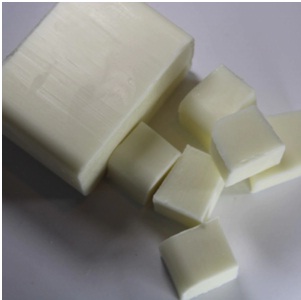
A melt and pour soap base consists of a few high-quality ingredients such as vegetable glycerin and natural fatty acids that can be used to easily create soaps right in your own home.
By using an array of different molds and combined with your own fragrances and colorful dyes, you can create a truly incredible variety of different soaps full of beneficial ingredients that are not only great for your skin but stimulating to your senses as well.
This guide will cover the most important aspects of creating your own soap with melt and pour soap bases and why you should focus on selecting only the highest quality plant-based ingredients for your soaps in order to get the best possible results.
Creating your own soaps can be a fun and rewarding experience if done correctly, and can even help you improve your skincare regimen through the use of more impactful ingredients in the soaps you use every day.
The Benefits of Using Nourishing Ingredients
Many common varieties of soap found in stores are not all that great for your skin. While they may do an alright job in terms of “cleaning” your skin or killing bacteria, they fail in just about every other category.
Between cheap artificial fragrances and a lack of moisturizing components, many mass-market soaps simply don’t offer you much in the way of quality. In fact, these soaps can dry out your skin and even strip your skin of its natural oils, leaving it irritated and open to more dangerous kinds of bacteria. The ongoing use of these kinds of products can even cause chronic skin conditions.
Taking care to only use beneficial and nourishing ingredients is important if you are concerned about the health of your skin as well as the overall health of your body. Your skin is actually porous and absorbs quite a bit of what touches it, which means your soaps and other personal care products can have a powerful impact on your well-being.
There has recently been a growing demand for soaps, lotions, body washes, shampoos, and similar products that contain ingredients that are not only more effective but truly beneficial for our body. Rather than simply “cleaning” the skin, it’s possible to impact it on a deeper level, cleaning it while maintaining the natural balance of oils and providing vitamins and minerals that actually help make your skin softer and stronger with continual use.
Keeping your skin healthy is a critical aspect of self-care and personal hygiene. While you may not even be aware how important it is to ensure that your skin is getting what it needs, the reality is that your skin is considered the largest “organ” of your body and requires quite a bit of attention and care if you are to keep it strong and feeling youthful and glowing.
The soap you use plays a key role in all of this, as an overreliance on soap with cheap ingredients can dry out your skin and leave it red and irritated. You may not notice these changes after you take a shower or wash your hands, because such issues arise over time as the oils on your skin are slowly stripped away and the artificial ingredients are allowed to be absorbed time and time again.
Practicing lazy hygiene like this may result in health troubles down the road. Doctors are only just beginning to understand the full scope of how what we put on our skin may influence our overall health. Even from the standpoint of maintaining a healthy and youthful appearance, you want to make sure you are using high-quality soap, otherwise, you run the risk of dry skin, clogged pores, or other complications.
The best part about making your own soaps using soap bases is that you can start with a great foundation and incorporate the specific ingredients you want that will meet your particular personal care needs. For example, it’s easy to start with a base that focuses on moisturizing and reducing the effects of dry skin. Perhaps you want ingredients that focus more on reducing irritation with soothing shea butter or similar ingredients, you have that option as well.
When you make your own soap from scratch starting off with the right nourishing ingredients, you wind up with a much more impactful product that will not only cleanse your skin but leave it feeling smooth and refreshed as well.
Simple Step-by-Step Guide to Creating Your Own Soap
Using melt and pour soap couldn’t be easier, but there are a few guidelines you should follow to get the best results and make the process easier. As complex as you might think making soap at home is, there really is nothing to it. Once you become comfortable with the basic steps, you can then branch out and apply your own ingredients and techniques to create an even greater variety of different soaps.
There are a few tools you will want to gather up and have on hand before jumping into the actual creation process. Nothing fancy is required, just utensils you should have lying around in your kitchen will do. A cutting board, large sharp knife, clear measuring cup, basic measuring spoons, and a whisk or stirring spoon should be all you need to get creating.
As you get used to the process and work on refining your recipes, you can utilize other tools to be more precise in your formulations, but for now, these tools will work just fine.
The first step of the creation process is to cut off the appropriate amount of soap base and stick it in your glass measuring cup. Depending on the size and shape of your mold, you may only need a part of your base to fill the cavity. The amount you need is typically determined by weight, and each mold differs, so you should have a good idea of the requirements before you begin.
If you are running a soap-making business or are creating beautiful products to sell on Etsy or a similar venue, you will want to be more precise and make use of tools such as a scale to measure the specific weight of the base in order to exactly match the cavity of your mold. You may also want to invest in a soap cutter and other tools that will help you in your endeavors.
As it stands for hobby purposes, you can simply get away with eyeballing it as long as you have a general idea of the amount of soap you need. There’s no shame in performing a couple of test runs by melting various amounts of base and seeing which amount best suits your particular molds.
Once you have the proper amount of soap you need measured, it’s time to do some melting. You might be inclined to think you need to perform some arduous scientific process here but all you need to do is stick the cup of soap in your microwave and heat it up in short bursts until the base has been melted through completely. If you are unsure of your microwave’s power or if you think yours has a reputation for overcooking things, you may want to begin with 30-second bursts and go from there. Melt times may differ considerably depending on the size of the soap base as well as the specific ingredients used. Most only take a few minutes under normal wattage microwaves on the normal setting, while some may take a little while longer.
Next is the best part of the whole process, adding your own essential oils. While a high-quality base will start with particular plant-based oils for specific effects, many of these won’t specifically be for the sake of strong effects and fragrances. Most soap bases are developed with a certain texture and consistency in mind, and it is up to you to style the fragrance and potential effects as you see fit.
This is where you want to have an idea in mind rather than rushing to include a certain oil at the last minute. Different essential oils create vastly different effects and have unique and often potent fragrances that don’t always mesh well together. Your base and fragrance should complement one another, and it is also a good idea for the base of the soap to mirror your intent in terms of beneficial properties.
For example, if you are interested in creating a soap that is specifically meant to help make skin feel silky smooth, you would want to try a shea butter base. The essential oil you add to this base should be one that also promotes a similar benefit, such as lavender, tea tree, or cedarwood. Keep in mind that most bases, while possessing their own light fragrance, are suited to adopt the fragrance of other more potent oils, so don’t be afraid to experiment.
As far as knowing how much fragrance you want to add, you can’t go wrong with about a teaspoon of oil per pound of soap. You have a little room to experiment here but remember that with essential oils, a little goes a very long way. Even if you feel like the end product won’t be as fragrant as you like, you can always go through the process and if it doesn’t turn out quite right, you can add a little more next time. In this way, you can easily adjust the recipe to your specifications without overthinking anything.
Keep in mind, you want to add your fragrance after you have finished heating your soap. Microwaving essential oils is not recommended and can degrade their quality.
Once you have added your fragrance, you can move on to adding the color you want. This step isn’t necessary at all, as the soap would otherwise come out the color of the base, which can actually be quite attractive depending on the ingredients used, but this extra step adds a bit of customization and fun to the overall process.
As with all components of your soap, you want to make sure that you are only using safe and natural dyes such as the ones you can find here in our online store. Food dyes and mass-market coloring options are actually some of the most potentially unhealthy and unsafe ingredients found in many types of products and should be avoided. For best results with your soap, you can use our safe micas or other options that are perfectly suited for use in homemade soaps and won’t have any unwanted side effects.
It only takes a little bit of product in this case to color an entire batch of soap, but to get the best results you want to follow the corresponding directions for that particular product. Once you add the color in question, simply mix the concoction together with a whisk or similar tool, and that’s all there is to it.
Once you have reached this step, all that is left is to pour the soap into your mold of choice. When pouring, take extra care to be slow and methodical, which will help prevent spilling any, which would ultimately be a waste of good soap. Now all that’s left is to let your soap rest for a few hours. To make sure no unwanted particles or debris fall into the soap, simply cover the mold with cellophane or place it in a location that is safe and out of the way. The refrigerator is fine as well.
High-Quality Soap Bases For Your DIY Needs
Ready to start making your own soaps using high-quality soap bases? You will find everything you need right here at Make Your Own Buzz. We have a wide selection of bases to choose from that will help you make soaps that are luscious and fragrant, and which will leave your skin feeling smooth and revitalized.
Simply take a look through our extensive catalog of products available here in our store or get in touch with us if you have any questions or would like more advice on how to create your own.